

I love to get outside and enjoy my deck. It is also fun to spruce your outdoor living space up a bit with different do it yourself projects. That is why I came up with this fun DIY hanging votive holders DIY project. They can be made with tin cans from your recycling bin and they will look cute enough to use for decoration, entertaining guests, or just enjoying an evening under the stars. You will be enchanted with how a can lantern lets the light shine through in fun patterns.
Illuminate Your Night with Upcycled Tin Can Lanterns
Looking to add a touch of charm to your outdoor space? Imagine the soft flicker of candlelight dancing against the backdrop of a starry night sky. With a few simple materials and a dash of creativity, you can transform ordinary tin cans into enchanting lanterns that will illuminate your night with style. In this DIY guide, you will learn how to upcycle tin cans into unique lanterns that will bring warmth and eco-friendly elegance to your home or garden. So, roll up your sleeves and get ready to shine a light on your creativity!
Gather Craft Materials
Before you begin creating your upcycled tin can lanterns, gather your materials. You will need a variety of tin cans in different sizes, a hammer and nail or drill, paint or spray paint in your choice of colors, tea lights or LED candles, and any additional decorative elements such as stencils. Having everything you need on hand will make the process smoother as you prepare to transform your tin cans into beautiful lanterns.
Craft Supplies Needed For Tin Can Lanterns:
- variety of sizes of tin cans from your recycling bin (cleaned out)
- hammer
- nail (you may want a few different sizes to achieve different size dots)
- wire (14 inch strips are great)
- pliers
- small votive candles, tea light candles, or flameless LED votives (here is an affiliate link to my favorites on Amazon)
- paint (see affiliate link for what I used or get detailed suggestions below)
For a tin can outdoor DIY project, you’ll want to use a durable, weather-resistant paint. Here are some great options:
- Spray Paint: Look for spray paints designed for metal surfaces, like Rust-Oleum or Krylon. These are made to withstand outdoor conditions, and they provide even coverage, especially for round surfaces like cans.
- Acrylic Paint: This is versatile and works well for tin cans if you apply a primer first. It’s also easy to find and comes in a variety of colors. However, it’s best to seal it with a clear acrylic sealer to make it weatherproof.
- Enamel Paint: This is a strong, durable option that can resist fading and chipping outdoors. It’s often used for metal projects and holds up well to the elements.
How To Make Tin Can Lanterns:
Ok, now on to how to make a lantern from a tin can with step-by-step directions and photos.
Prepare Your Tin Cans
To prepare your tin cans for transformation into beautiful lanterns, start by cleaning them thoroughly inside and out. Remove any labels or adhesive residue by soaking the cans in hot, soapy water and scrubbing them clean. For safety, make sure there are no sharp edges. If you find rough edges or jagged cans, select a different can or use a fine grit sandpaper to carefully smooth it. For added protection, you can apply a bead of hot glue or silicone sealant around the sharp edges. This softens the rim and creates a smooth surface. Then dry the can exteriors thoroughly.
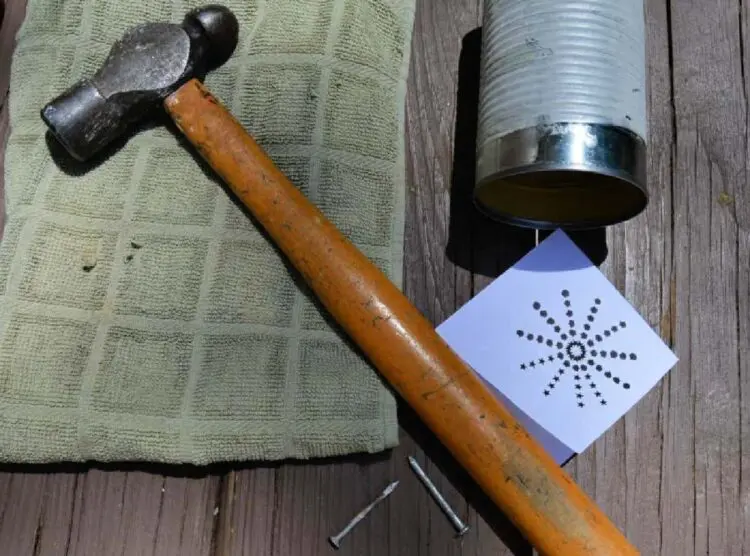
Next, fill cans about 3/4 full with water and freeze. The frozen water will allow the tin can to hold its shape without denting the can itself while you hammer the nails through.
Tin Can Lantern Patterns
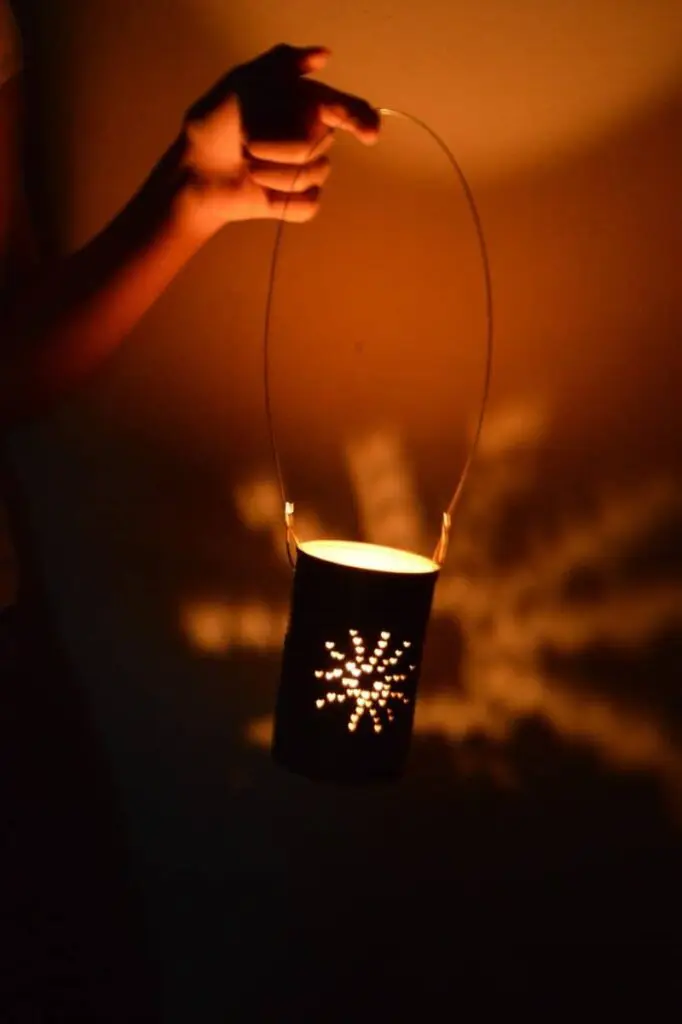
While the can of water is freezing, you can pick a pattern for the holes. This will allow light to shine through when the lanterns are lit. You can spell a word with a letter on each can (like JOY), go with a simple design like a star or heart, use geometric patterns, or you can decide to do an abstract free hand pattern like a sunburst.
If you decide on a letter or a pattern you will probably want to draw that out on paper so it can serve as your stencil when you are ready to start hammering. Or you can find free printable stencils. While the free hand pattern is a bit less work beforehand, you do need some creativity to go along with it.
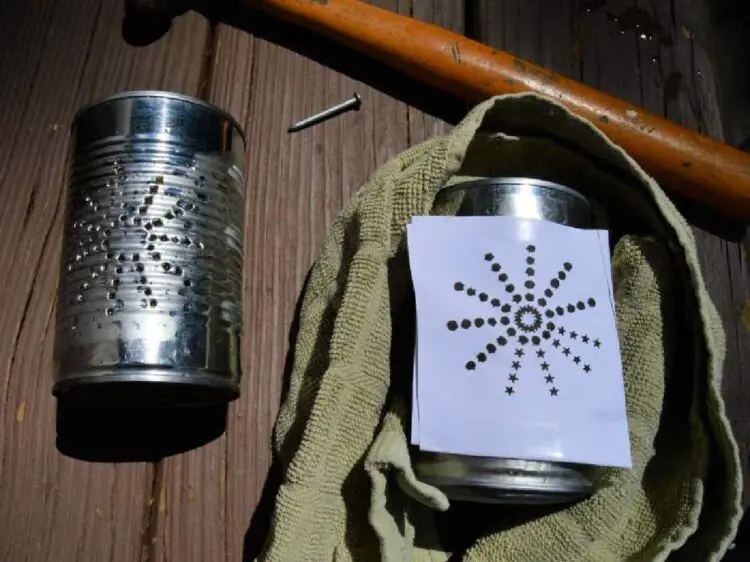
Remove a can when the water is frozen through.You can now tape a stencil to the can. Masking tape works well for this. Wrap the can in a dish towel to help hold it in place and keep your fingers from getting too cold. Begin hammering just enough to punch through the tin and keep moving along making your punch holes at even intervals to create the pattern.
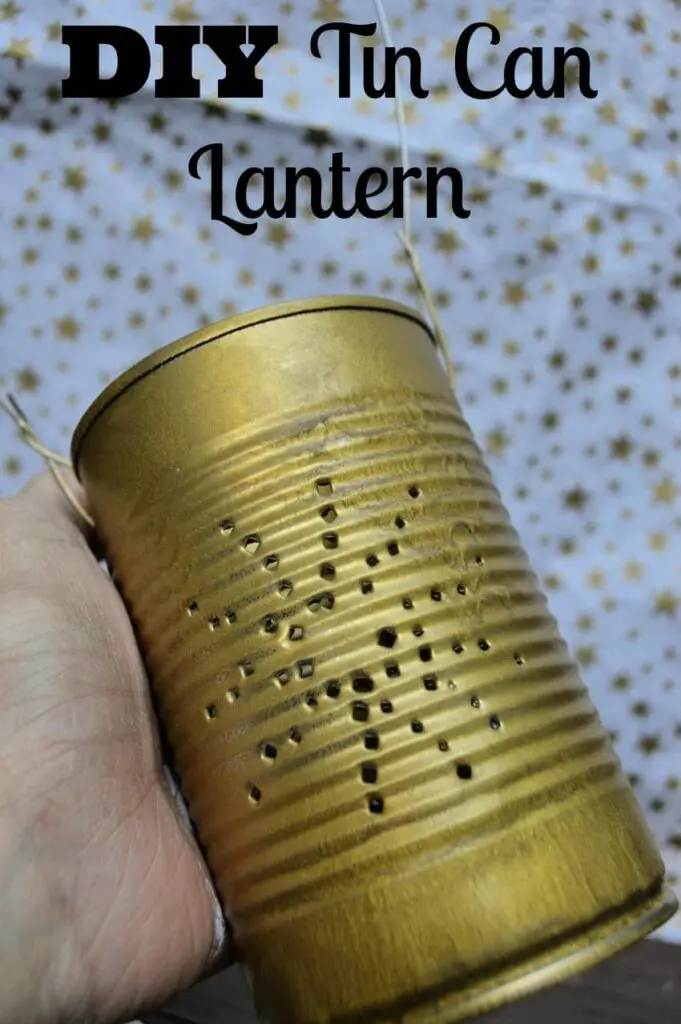
When you have created a pattern you like, you can add a nail hole to the top of each side of the tin can in order to make them into hanging votive holders.
After letting your ice melt, you can dump out any remaining water and dry the can out.
Add Final DIY Lantern Design Elements
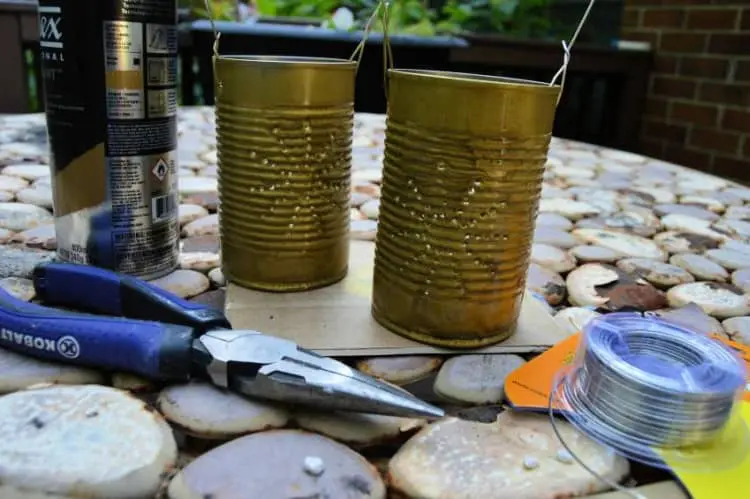
Now, you can move on to the next step of designing your lanterns with paint and other embellishments. If you choose to paint your votive holders, now is the time. You can leave them the shiny silver they are naturally or give them a coat of paint. You may consider using colorful paints (like turquoise) to add vibrant hues to your cans. I chose a quick spray paint coat of classic gold over some old newspapers to protect my surfaces. Then, allow your beautiful lantern to dry.
You can set your lanterns around on spaces or you can add a wire handle to hang them with. Cut your wire into a 14 inch piece and then stick each end of the wire into your hanging holes and twist wire onto itself to secure in place. Now, you have a hanging lantern.
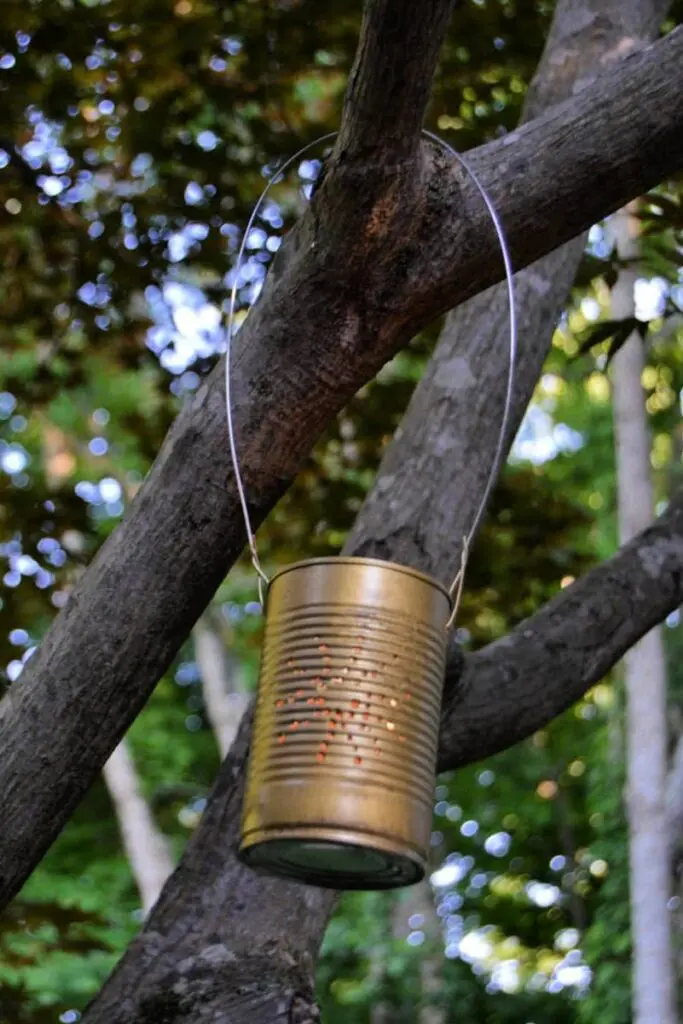
These DIY hanging votive holders look great on a shepherd’s hook or even a tree limb! Or leave off the hanging wire and set the DIY tin can lanterns on your outdoor tables for some added light and decoration. Just add battery tea lights and enjoy the glow through the pierced lantern.
Conclusion
Turning empty cans into tin lanterns is a rewarding experience. By infusing your personality into your upcycled lanterns, you can create a unique and special ambiance in your space that reflects your style and creativity. Placing them strategically around your home or outdoor area can create a warm and inviting atmosphere, perfect for cozy nights or festive gatherings. The gentle glow of the candlelight (or LED lights) shining through the intricate patterns on your tin can lanterns will cast mesmerizing shadows and add a touch of magic to any space.
In just a few simple steps, you can transform old tin cans into stunning lanterns that will not only illuminate your space but also bring a touch of creativity and sustainability to your home or garden. Do you think you will try this fun diy project to spruce up your outdoor space?
Related Posts:
Tin Can Planters: Eco-Friendly Kids Craft Project
How to Make A Vase Out Of A Tin Can


