

Growing cucamelons from seed is easier than you might think. In this post, I’ll guide you through all you need to know about how to grow them, and share my expert tips for success.
You’ll learn the ideal methods you can use and the timing for exactly when to sow your cucamelon seeds, along with step-by-step instructions for how to plant them.
I’ll also show you how to care for your seedlings, pot them up, transplant them outside to your garden, and much more.


Growing Cucamelons From Seed Overview
| Days to germination | 4-13 days |
| When to start indoors | 4-6 weeks before last spring frost |
| When to sow outside | 1-2 weeks after last spring frost |
| Days to maturity | 60-70 days |
| Sun exposure | Full sun |
| Seed planting depth | 1/4 inch |
| Plant spacing | 3 inches apart in groups of 4-6 |
| Soil temperature | 70-90°F |
How Long From Seed To Harvest?
It typically takes around 60 to 70 days for cucamelon plants to become mature enough to start producing fruit when you start them from seed.
Flowers usually begin to appear around a month after planting outdoors. Once they’re pollinated, the tiny fruits will begin to develop.
The exact time frame depends on environmental factors like temperature, sunlight, and moisture levels.

Seed Starting Methods
The two methods you can use to grow your cucamelon seeds are: starting them indoors, or sowing them directly into the garden. You can find out more about each seed starting method here.
- Starting indoors – For the best results, I recommend starting them indoors. This puts you in control of the environment, makes it easier to get consistent germination, and gives them a few extra weeks to mature so they will produce fruit sooner.
- Direct sowing – If you would rather sow them directly in your garden, plant the seeds in groups of about 4-6, and space them 3″ apart. Wait until the ground is between 70-90°F, which you can check with a soil thermometer.

When To Plant Cucamelon Seeds
You should start your cucamelon seeds indoors about 4-6 weeks before your average last spring frost.
If you want to direct sow them, do it a week or two after the last spring frost, when the ground temperature is between 70-90°F. Cucamelon seeds won’t germinate in soil colder than 60°F.

How To Prepare The Seeds For Planting
Although it’s not essential, you might like to try soaking your cucamelon seeds in room temperature water for 24 hours before planting them.
This can help soften the seed coat and speed up germination.

Cucamelon Seed Germination Time
On average, you can expect to wait anywhere from 4 to 13 days for your seedlings to begin emerging from the soil.
If you’d like to hurry the process along indoors, use a heat mat to keep them warm, and make sure the soil stays consistently moist throughout the germination period.
Covering the tray with a lid or clear plastic wrap is good, too, as it helps retain moisture and warmth.

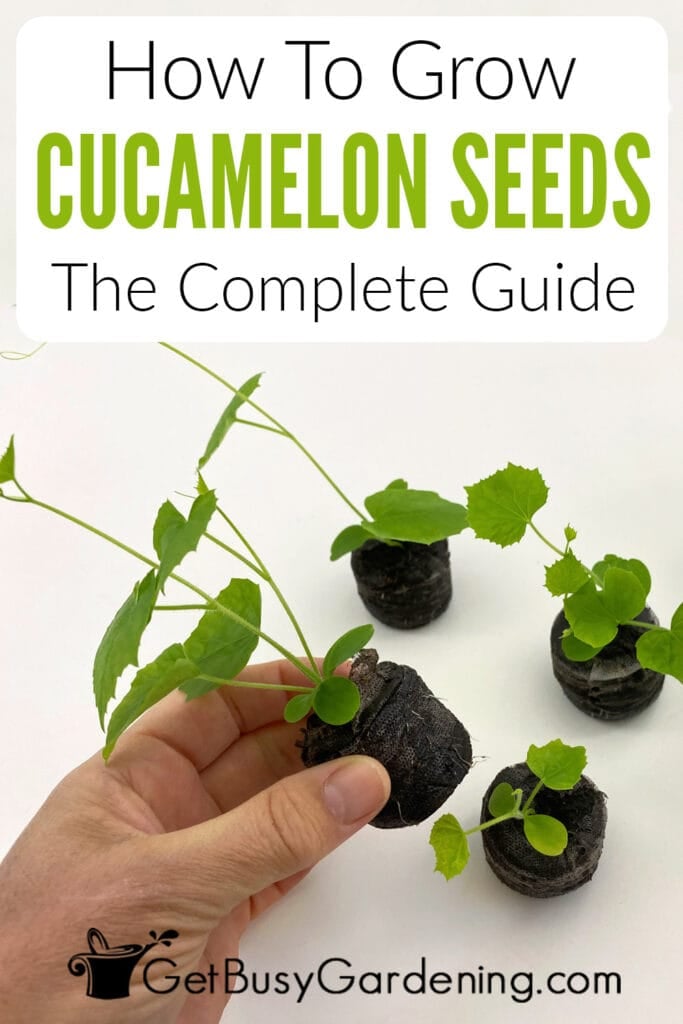
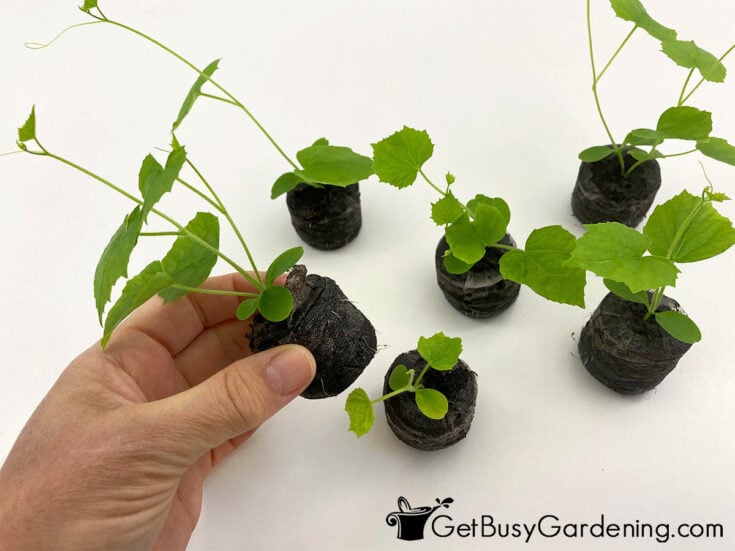
What Do The Seedlings Look Like?
Cucamelon seedlings look a bit like cucumber or melon seedlings – just smaller. When they first emerge, they have two pale green, oval-shaped cotyledons, or seed leaves.
They will develop their “true leaves” shortly after. The true leaves are heart-shaped with serrated edges, and may be a little fuzzy in texture.
Related Post: How To Grow Cucamelons (Mouse Melon)

How To Care For Cucamelon Seedlings
Once your seeds have sprouted, it’s important to give your seedlings the proper care they need to grow strong and healthy right from the start. Here are my tips for success:
Light
Make sure your seedlings receive a consistent source of light to prevent them from becoming leggy and developing weak stems and roots.
To achieve this, hang a grow light a few inches above the trays at all times, and use an outlet timer to automatically run them for 14-16 hours per day.
Water
Keep the soil evenly moist by watering when the top inch feels dry to the touch. Don’t let it become waterlogged, as this can stop the seedlings from growing well.
It can be tricky to get the balance right, so I recommend using a moisture gauge and maintaining the reading between 3 and 5.
Temperature
Cucamelon seedlings do best in temperatures between 70-80°F. You can use a thermometer probe to monitor this, and place your tray on a heat mat to keep the soil warm.
Don’t expose the seedlings to extreme temperatures, as this can stress the plants.

Fertilizer
Once your cucamelon seedlings have developed their true leaves, start feeding them with compost tea or an organic fertilizer diluted to half strength.
Air Circulation
When the majority of seeds in the tray have germinated, I recommend giving them some fresh air. This helps stop mold from developing and produces stronger seedlings.
To do this, prop the lid open for a few days, then eventually remove it altogether. Check the moisture level of the soil often after this, as removing the lid will make it dry out faster.
Thinning
If you planted your cucamelon seeds too close together, you’ll need to thin your seedlings as they develop. If you don’t, they’ll become overcrowded, and their growth will be stunted.
Choose the strongest looking ones as soon as they are a few inches tall, and then pinch or snip out the rest.
Potting Up
You should repot your seedlings into larger containers as soon as they are twice the height of the tray. This will provide the room they need to grow.
I find that biodegradable pots make it easier to plant the seedlings into your garden, and reduce the risk of shock. But plastic nursery pots are good too, and have the advantage of being reusable.

Transplanting
You can transplant your cucamelon seedlings into the garden once they have at least two sets of true leaves, the ground is warm enough, and the danger of frost has passed.
But before you plant them outside you’ll need to harden your seedlings off. This prepares them for life outdoors, and is a vital step that you must take – without it they may not survive.

FAQs
To germinate cucamelon seeds faster, try soaking them in room temperature water for 24 hours before sowing. After planting, keep the soil between 70-80°F, and make sure it stays consistently moist.
It’s not essential, but soaking your cucamelon seeds before planting helps soften their coats, and can speed up germination.
No, cucamelon seeds don’t need light to germinate, and actually do better in dark or low-light conditions. They do, however, require consistent light once the seedlings begin to emerge from the soil.

If you’re tired of struggling, and want to learn how to grow any plant you want from seed, then enroll in my online Seed Starting Course. It’s a wonderful, fun, self-paced course that will teach you everything you need to know to easily grow your own seedlings. Enroll and get started today!
Or, if you just need a refresher, then my Starting Seeds Indoors eBook is for you! It’s a quick-start guide that will get you planting seeds in no time.
More About Growing Seeds
Share your tips for planting and growing cucamelons from seed in the comments below./
Printable Step By Step Instructions
How To Plant Cucamelon Seeds
Discover how to grow cucamelons from seed with my step-by-step instructions. You’ll learn the best time for planting, the most effective technique to use, how to care for your seedlings, and how to safely transplant them into your garden.
Instructions
- Fill the tray – Use a hand trowel to fill your tray with a well-drained seed starting soil, or add the plantable pellets, then moisten the medium.
- Decide how many seeds to plant – If your seeds are brand new, you can just plant one per hole. But if they are old or have a low viability rate, then plant 2-3 per hole and thin them later.
- Sow the seeds – Plant your seeds about ¼ inch deep. You can make a hole and drop them in, or place them on top and press them down gently into the soil. If you’re direct sowing them in your garden, dig shallow furrows and plant the seeds 3 inches apart in groups of 4-6.
- Cover with soil – Cover the seeds with ½ inch of medium, then lightly press it down so the soil comes in contact with the seed.
- Water the flats – Pour water into the tray and allow the soil to soak it up. Ensure that the medium is moist but not waterlogged.
- Cover the trays – Place the lid on the tray if available, or cover it loosely with plastic wrap.
- Keep them warm – Place the seed tray in a warm spot that stays between 70-80°F. Use a heat mat to provide warmth, if necessary.
Notes
- While your seeds are germinating, keep the medium consistently moist. If it’s too wet or dry, they may not grow. You can use a moisture gauge to monitor it.
- As soon as the seedlings start popping up out of the soil, turn on the grow light and hang it a few inches above them at all times.
- Once your seedlings have several sets of true leaves, you can pot them up into 4” plantable or plastic nursery containers.


